Building a better mousetrap...

Somatek

New member
I've never liked the commercially available bubble machines for home growers so I decided to play around with making a better version. This is the proto version so far, the Somatub 0.1

8B3F7124-DF02-450A-B3F2-931292B6868F.jpeg

Pretty simple, I used a 5gal stainless steel stock pot and then beat the bottom into a slight concave and drilled a 1/2 flush mount stainless steel drain in the center. I picked up one of the agitators off amazon to see if it'd work, it barely created a vortex so I added some fins to the top made from half of a thin plastic clamshell (34th street seed company package to be specific) which I then cut diagonally in half again and drilled some holes in to wire it to the agitator. I assume the motor will burn out sooner then later but I've already got ideas on how to improve the design.

20220816_194914.jpg

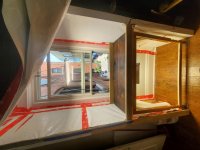
The lid (not pictured) was inverted so it sits flush with the water when full, I plan to put an ice pack on there to help keep it all cool. Which brings me to the next step, insulating the whole thing by adding 2-3.5 inches of styrofoam all around it (leaving space underneath and on top for ice packs) and making a lid that'll seal it all up while running. When I replace the agitator I plan to put the motor on top of the box with a drive shaft running through the lid to an agitator at the bottom; so the heat from the motor won't heat the water and it won't catch any trichs when drained (I'll have to rinse the current one off before rinsing the system).

The last idea I'm testing is using 1gal bubblebags hung vertically to drain the water in a flow through design so it's easier to run solo without lifting the weight of the bags. I'm getting old, I've always been lazy and with a bad back anything I can do to reduce the strain on it is worth tinkering with. I assume I'll have to adjust the height of the different bags, there's only about an inch between the 220 and 160 work bags, 2 inches to the 120, and then 4 between it an the 75 and almost 6 to the 25 at the bottom. Hopefully that's enough room for the water to drain straight through without backing up but I'll find out how it works when I test it tomorrow morning.

I'm more then open to any suggestions or constructive criticism as I'm making this all up as I go. Thanks for looking and wish me luck with the inaugural run tomorrow
 
Last edited:
So far it's been a lot of learning and a bit of cursing lol. Probably wouldn't have been as much cursing if I didn't wake up at 4:30 am while it was nice and cool to run it.

First issue was putting too much ice in, so the agitator was having a hard time getting it moving. After helping it with a wooden spoon the ice pulled the power cord off the side and it got sucked into the vortex then tangled on the agitator... I finished the first wash by hand at that point as I wasn't awake yet.

When I drained it, well, tried to drain it, I realised the second mistake; not leaving enough clearance under the bottom which made a kink in the hose where the plant material got clogged. Jabbing it with my soil thermometer cleared that out while also causing painful localized hypothermia from keeping my hand submerged. With it properly draining it caused the bubble slide to fail as the 25mic bag got too heavy for the support I had quickly whipped up.

I ran it again trying my original plan of having the agitator mounted on the lid at the top, also adding more water and with less ice due to melting it worked. So today I'm going to test some different ice to water ratio's to find a balance. I'm also thinking of insulating it before running again so I can use less ice and maintain cold temps. With no insulation the temp raised about 1-1.5C over two hours I ran it (ambient temps were 16-19C, initial temp was 3-4C, final temp was 5C), so I'm hoping I can use half or less the ice once it's insulated with ice packs underneath/on top. I'm also going to compare having the fins vertically instead of horizontal, see if I can get closer to the motion of stirring a spoon. I'm hoping I can figure out how to mount it functionally on the bottom so I can compare running it on top vs the bottom to compare that as well, I assume the bottom would be better as it creates the vortex that Frenchy talked about being so important but why assume when we can just test?

The draining issue is easy to fix by building a not-so-ghetto frame to hold it but for now I'm leaning into ghetto growing and just jamming more wood/things underneath to create the needed space. I need to finish building out my grow before any other projects... I'll also compare using a 220mic bag in the tub vs putting a screen over the drain to keep it clear, mostly being awake should resolve those issues lol.

Same with the bubble shoot, it worked well other then the frame not being able to hold the weight. For now I'll fix that by simply twisiting the copper around itself to form a loop instead of just making a hook at the end, the weight was too much and the hooks straightened until they gave out. When I make a proper stand for it I'll build a support structure into it to hold the bags. I'll also open a slit opposite to where the rope around the top comes out, that way instead of having to screw around with wire rings that the top lip is folded over to hold them. I can simply use the rope to attach to the supports, although I imagine the 25 and 73mic bags will benefit from putting the ring inside so it holds a circular shape with weight in them instead of collapsing. Part of me is wondering if that's being lazy though and if I'd be better off sewing the rings onto the bags permanently instead (fold the top lip over the ring and then sew it shut).

I've got the hash collected out drying now, I used year old trim/bud to test so it's very dark but once it's dry I'll try to get some pics to show what the contamination looks like.
 
I was originally planning to use a bag, then decided against it when I saw the agitator struggling to get things going. As my hand froze poking the clogged drain free I was definitely cursing myself lol, I'll definitely use it next time. Thanks for sharing though, I always enjoy others experience even if it doesn't match mine (especially when it doesn't). I may get a simple 1/2" drain screen to test at some point though as I'm pretty lazy and if it doesn't affect quality will take the path of least resistance by just rinsing the tube out since I have to anyway.

How do you find the stainless steel screen compared to silkscreens? I'm a big fan of dry sieved and actually prefer it if done well but that's a lot more work whereas bubble is pretty easy to get a good quality. Do you press your kief right after sieving? Making a tumbler is another project but still in the planning stages lol.
 
I think I have an idea what you mean, a friend use to process it in a similar way warming it in foil on the stove and the pressing it with a bottle filled with hot water. Definitely made a product that reminded me of the 90's afghan hash we use to get around here.

Trust me, I have a lot of experience with the old jerking tech (some of it even with bubble hash :laugh:) but my back really doesn't like that kind of activity anymore, which is why I wanted to try the bubble slide idea with smaller bags vertically to hold the water as it drains. I realised there's no need for bigger bags if using a machine since the bud isn't being mixed inside them, they just need to be big enough to hold the volume of water. Although I've realised I'll probably have to control how quickly it drains as the bottom bag will probably over flow, which can be solved by replacing it with a 5 gal bag. Projects like this make my brain happy as you need to think creatively to solve problems. Thanks again for your input, I'll definitely have to try some steel screens when I'm done with this project and planning a dry sieve system.
 
I got distracted for a couple days building a veg area, a friend happened to have some wood that was perfect so that became the priority. Although in true ADHD form I switched between them yesterday after going to the hardware store to pick up some odds and ends. So I learned how to make a 4x8ft sheet (1.5" thick) of insulation into a 19x19x17.5" box. Just have to glues the sides on and finish off a couple things and then I can start testing the ice to water ratio to keep it chilled and then the agitator.

20220820_151725.jpg
The glorious cube

20220820_151812.jpg
The bottom pops off so I can pack ice packs in.

20220820_151848.jpg
I recessed the top to create a better separation, I may measure how much room I need for the ice pack on the lid and fill add another recessed layer using one of the circular cut outs from making the main chamber. With at least 3.5" of insulation all around I don't know if it's needed though.
 
20220821_141544.jpg

Finally done building the veg area out of old wood/repurposed junk, so I finished insulating the somatub, which took a lot longer then expected and in retrospect I should have tried my friends suggestion of using spray foam insulation instead. Building a box out of doorskin (1/8" plywood) would have been quicker, sturdier and easy. Plus my house wouldn't be filled with stray styrofoam bits floating around...

Conveniently I had just enough scrap left over to build a stand to hold it all together, the last thing I want to change is adding a ball valve so I can shorten the hose and have it drain directly into the bag below. If I have enough tuck tape left over I'll also tape all the exposed edges up so bits of styrofoam don't break off constantly. That and of course stencil the name back on the outer insulated shell to make it pretty and ghetto fabulous.

Tested it today by filling with a bag of ice (10 ice cube trays fill one bag), the first half bag I added melted within an hour and got the temp down to around 13-15C. The second half I added got the temp down to around 7C and was mostly melted after another 1.5 hours. I just woke up from an accidental nap (best kind of accident ever) and 4 hours later the temp has only gone up to 9C. I should mention the ambient temps were around 30-32C at the peak today, which happens to be when I was testing it. So I'll count that as a success, most of the ice seems to have melted getting the water temp down. So if I throw the water in the fridge overnight before running it I think one bag of ice will be enough to get the temps down and keep them there while it's running for awhile.

20220822_132027.jpg

If I don't fall back to sleep I'll try running some leaf through tonight, possibly compare having the agitator at the top vs bottom to see how it affects things. Of course I have to stay awake long enough first and bed seems to be singing siren songs that are calling my name...
 

Attachments

  • 20220821_141544.jpg
    20220821_141544.jpg
    124.9 KB · Views: 3
Yep, I freeze everything first to get it cold as possible. It's not as hot today so I'll set it up to run later this afternoon once the hottest part of the day has passed.
 
So I fell asleep the other other night, didn't drain the tub and then yesterday as I was busy dealing with an errant UPS driver taking my clones on an adventure. When I finally did drain it the water was only 15C, roughly 24 hours later after another day hitting 30-32C. Apparently the insulation works lol
 
  • Like
Reactions: 180
Back
Top