


WrinkledNugSack
Well-known member
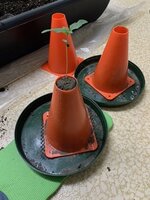
The Traffic Cone Incubator/Transplanter
Step1: In Canada, Dollar Stores are common where we can buy cheap mini traffic cones for less than $2.00 ea. I suggest you buy as many as you need for a "test".
Step 2: Cut the top off of the cone so that you have about a 4-5 cm opening at the top of the cone. (The size is not overly important)
Step 3: Take an open flame torch or heat gun and heat the area at the top of the cone that you just cut off. The idea here is to just melt the plastic enough for the edge to “roll over” or soften enough so that it's not sharp to the touch.
Step: 4 Buy some gutter mesh, or any other similar mesh material. I have actually gone without the mesh, but you have to be a little more careful handling the unit.
Step 5: Cut a piece of the mesh material long enough to cover the bottom of the traffic cone, and allow for a bit extra to grasp onto on each side of the base of the cone.
Step 6: Find a tray of your choice to catch water run-off that is large enough for the traffic cone and mesh to sit on… I just use a shallow tray or the pot trays (base) that are readily available at any gardening centre.
Step 7: Assuming that you have already popped/cracked/sprouted your seeds using the paper towel method, turn the prepared traffic cone up side down and fill it with the soil or medium of your choice. (It may take a grow or two to figure out what works best for your soil type as far as compaction into the cone goes.)
Step 8: Place the mesh over the bottom of the cone and invert it; placing the entire assembly onto the tray.
Step 9: Use a chopstick (or similar tool) to make the hole in your medium where the seed will be placed. (You will plant the seed through the top of the traffic cone obviously)
Step 10: Place the seed into the hole you just made with tweezers and either carefully backfill the hole with the chopstick, or sprinkle some soil over the seed, then lightly water it in. (“I think” it’s worthwhile having your soil moistened “almost to” your preferred dampness before filling the cone… this way the small amount of water you add after placing the seed in the medium is kept to minimum. (You don’t want to have to add so much water that you flush the seed out of the soil or disturb it too much.)
Step 11: Place a sandwich bag over the top of of the cone to retain the moisture level and act as an incubator, and place it under your grow light.
Step 12: After the seedling emerges from the soil and the true leafs are growing, remove the sandwich bag and harden off the seedling for a day. ((* see the footnote below.) About a week to 10 days after planting the seed (the seedling should be about 5-7 cm in height)
Step 13: Prepare the final pot. I use 7 gallon pots, so I have to place a small amount of soil in the bottom of the pot so that the top of the cone when placed inside the fabric pot is at the desired height in relation to the top of the fabric pot.
Step 14: Grasp the gutter mesh on each side of the traffic cone and lift it off of the tray it has been sitting on. The mesh is there to hold the medium inside the traffic cone while doing this procedure and can be left in place between the bottom of the cone and the soil in the final pot. Lower the traffic cone (with its seedling) inside the fabric pot, then remove the traffic cone. The seedling should not be damaged provided that the edges of the cone you cut off aren’t sharp… hence the melting or “rolling over” the cut edge.
“If” the moisture level is right, the traffic cone will easily slip off of the medium leaving your cone of soil and its seedling sitting on the bottom of your final pot ready for backfilling. At times, you might have to squeeze the sides of the traffic cone to loosen the medium enough for the traffic cone to slip off cleanly.
Step 15: Backfill the final pot with your prepared medium… the “cone shape” of the “plug” allows it to sit in the bottom of the final pot without falling over, and it makes it easier to fill the final pot with soil without damaging the seedling or its roots. Simply put, it allows you to protect the seedling with one hand while you backfill the soil with the other… it’s your “third arm”.
- I find that the week to 10 days allows the main tap root to already reach the bottom of the cone, and some of the side roots to reach the edges of the cone, but it's not long enough to make it necessary to disturb the cone/medium/roots when transplanting. In other words, I never allow the cone to become root bound… I want the roots to continue spreading in the final pot without having become stunted in any fashion. I also think that it is very important to use the same medium in the cone as you are going to use in the final pot… dissimilar mediums can cause the roots to stop spreading naturally.
I “think” this technique/hack/trick would be good for people who find transplanting to be a bit of a challenge or for someone who may have limited mobility or use of one arm or hand; personally, I “always” use this technique now.